How to improve SOLIDWORKS macro speed 10x [+ bonus]

Computers like doing the exact opposite as most humans do:
– they like doing the same simple thing over and over again.
So you wrote a macro to give your pc something to do. But now you’re just waiting for the macro to finish running. Can’t this go a little faster?
By combining a few macro commands I was able to improve my macro speed from close to five minutes to 8 seconds! It is now 35 times faster! In this post, I’ll share with you how I got there and what I learned along the way.
In this blog post, you’ll find
- What determines the speed of a macro?
- Trade-offs
- Test cases
- Keeping track of time
- 8 methods to increase performance
- Call DoEvents only when needed (3 times faster)
- Enable AddToDb to make sketching faster (4 times faster)
- Disable DisplayWhenAdded to make sketching faster
- Disable updating the feature tree (25% faster)
- Disable updating the configuration tree
- Disable updating the graphics area (30% faster)
- Hide the SOLIDWORKS window (2 times faster)
- Lock the user interface (20% faster)
- Test results
- Bonus: Reading from Excel 100 times faster
- All results compared
- Afterthoughts
1. What determines the speed of a macro?
As always, there are many factors. We already treated a few of them in our most popular blog post so far: Slow drawing in SOLIDWORKS? Here are 12 possible reasons. Many items that affect drawing speed affect macro performance as well: CPU speed matters, model complexity matters, laptop power settings matter.
But you are not in control of those when you are writing a macro. Fortunately, you can turn a few dials to tweak performance from within the macro. We have found six eight settings that have a real impact, plus a bonus one at the end.
2. Trade-offs
You can get the biggest boost if you put speed above anything else. That’s why some race cars look like this:

You need to answer a few questions to create the proper approach:
- Do all background processes need to continue while the macro runs?
- Does SOLIDWORKS need to worry about creating sketch relations?
- Do you need to keep the user informed all the way through?
- Do you need to keep the program visible?
The more often you can answer NO, the more you can improve your macro speed.
3. Test cases
I wrote a few macros to test these commands first. I’ll share the macro speed at each stage at the end of the post.
My ultimate goal is to get a macro that now takes 24 hours (yup) to, say, about ten minutes. That way I wouldn’t have to plan my day around running the macro once.
The first test case is this:
- Create 100 sketches
- Fill each sketch with a horizontal line of 100 sketch points.
- A normal rebuild.
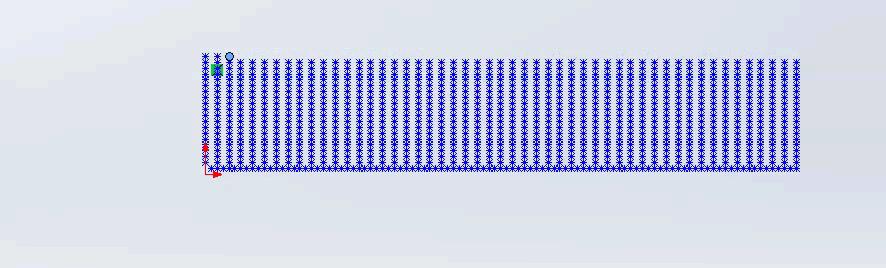
The resulting model has a 10,000-point equidistant grid with sketch points and takes, at its worst, 4 minutes and 37 seconds to run on my 2016 workstation laptop:

Test case 1: 100 sketches with 100 sketch points each
4. Keeping track of time
To find out how long my macros and individual functions run, I created a function to time them.
When I suspect a group of functions of running too slow, a throw in a few PrintTime calls in there to find the culprit. It shows the current time up to hundredths of a second, which is the accuracy of the Timer function.
1 2 3 | Function PrintTime(comment As String) Debug.Print Format(DateTime.Now, "hh:mm:ss") & "." & Right(Format(Timer, "#0.00"), 2) & " - " & comment End Function |
When I did some digging in another macro this morning, I timed all of my functions. What I found was that the bulk of the running time was spent on changing views, not actual modeling work. Turned out the view transition for a ‘Zoom to fit’ action took half a second, which was 85% of the time my function took to complete. I turned off these animations and BAM, instant speed gain.
The method above works for VBA. If you’re working with C#, you should check out the Stopwatch class and its Restart method.
5. 8 methods to increase performance
5.1. Call DoEvents only when needed
Your computer performs many tasks, even when you are just staring at the screen wondering how the hell you are going to get the cost of your design down by 30%.
It checks your keyboard and mouse for inputs for example. You have probably noticed that when your computer is really busy and you click a few times.
The clicks seem to go unnoticed until they are suddenly handled in a quickfire way after the computer is done crunching its heavy task. We call these things events, and Windows has a lot of them.
You can add the DoEvents command to your macro to keep a form responsive, even when the computer is really busy. It just carves out some time to repaint the form at the cost of slowing down execution. Look how nicely everything is being kept up to date, right until Windows decides to set the screen to white:
For certain macros, adding the DoEvents line is a blessing because it no longer looks like the computer has crashed.
In other cases, like drawing these ten thousand sketch items, the program gets interrupted 10,000 times as well. Imagine getting interrupted 10,000 times in a workday, damn.
So be careful when you use it and where you place it. In this test case, I removed the line and the running time immediately went from 04:37 to 01:26. The macro speed already improved by 3.2 times. The screen now stops responding after 5 to 15 sketches until the task is done.
5.2. Enable AddToDB to make sketching faster
Creating sketch items is one of the most basic things you can do in SOLIDWORKS. That’s probably why the content of the sketch toolbar hasn’t really changed since 2000. Back then, SOLIDWORKS still looked as dandy as this:

A lot of fancy and user-friendly things are happening under the hood by now. Many of which affect macro speed.
Line-ends snap to origins and midpoints, lines get tagged as being horizontal or vertical and they snap at 45 degrees. And that’s only the things that you can actually see.
When you want to import 100,000 points into a 3D scan, you don’t need SOLIDWORKS to check each point if it may coincide with another one. So you turn it off.

By calling the AddToDB method, you can skip all of those smart things and it becomes blazingly fast.
You can now add sketch entities directly to the database by setting AddToDB to true. The running time in my 100*100 grid went from 1 minute 26 to just 21 seconds, a 4.1 times speed increase on top of the 3.2 times in section 1. It’s perfect for sketch-heavy macros.
It’s just less than ideal for macros that create fancy sketches because at those times you could really use a line to snap to the origin.
Make sure you disable the command after you’re done with the SOLIDWORKS session.
Side effect: preventing sketch items from appearing in the wrong position
There is another reason for using AddToDB. The image below shows my initial result. It doesn’t look like 100 points because there are two at each position.
Hence the coincident relation icon.
When AddToDB is not used, by default two sketch entities at around one millimeter apart will snap together. You could turn off snapping programmatically or manually in the settings or enable AddToDB to prevent this from happening.

Sketch points appear in the wrong position.
5.3. Disable DisplayWhenAdded to make sketching faster
This is another speed improvement for sketching.
By setting DisplayWhenAdded to false and AddToDB to true (or it will not work) SOLIDWORKS halts displaying the new sketch objects until you run GraphicsRedraw or EditRebuild3.
I have not run tests with this command yet, so I don’t know how much faster it is. Please let me know if you have some test results to share.
Ditch the Toolbox, once and for all
Start using the fastener library that actually follows the standards
- No more mate errors
- Made for speed
- No yearly license fees
5.4. Disable updating the Feature Tree
This improvement is basically a no-brainer when the user doesn’t need to see everything that is happening.
I haven’t noticed any disadvantages at all with this command.
When you have a model object in the variable swModel (like most of us do), this is the line you need to speed up your code:
swModel.FeatureManager.EnableFeatureTree = False
I reduced the running time by 25-35% after changing this setting. Just set the updating back to true when you’re done with that model.
5.5. Disable updating the Configuration Tree
Just as you can disable updating the feature tree, you can disable the configuration tree. When you are adding or deleting a bunch of configurations, SOLIDWORKS will be faster if it doesn’t have to update the list of configurations.
To speed up your code:
swModel.ConfigurationManager.EnableConfigurationTree = False
Set it back to true after you are done. I just found out about this method but I haven’t tested it yet, so I don’t know what the performance impact is.
5.6. Disable updating the graphics area
When you don’t need the user to see everything that’s going on while running the macro, you can stop the graphics part of the screen from updating. You could also use this trick to prevent others from reverse-engineering your code because you are hiding the steps to get to the end result.
We need a few extra lines here because we need to figure out which part of the screen to keep from updating. Since the user can have multiple files open and in view
1 2 3 | dim modView as ModelView set modView = swModel.ActiveView modView.EnableGraphicsUpdate = False |
Setting EnableGraphicsUpdate to false alone allowed my macros to run about 30% faster. Just as with the previous function, be sure to flip the switch again when you’re done.
I did run into one drawback, however. When you save files from a macro that has no graphics updating, the preview images in Windows are not available. I noticed a drop in file size because of that as well. That is why I chose not to use this function in my final project.
5.7. Hide the SOLIDWORKS window
This is one of the most drastic measures to reduce waiting times and improve macro speed. You can actually hide the complete SOLIDWORKS window.
I think this feature was designed mainly to prevent the user from noticing the program is used at all. In my case, the program was open already and I start the macro from the VBA editor. When I hit go, the SOLIDWORKS window disappears and only the editor window remains.
I actually combine the Visible function with the UserControlBackground function to get this done. The first one hides the window, the second one prevents the user from having control over the application. They are somehow wired together under the hood in a way that I don’t really understand yet.
The result: I had to wait 11 seconds instead of 20. Another improvement of nearly two times.
We have to make a few side notes here:
- You need to close all documents before you set the Visible property, or it doesn’t work.
- Set UserControlBackground before setting the visibility or the window might not disappear
- There are a few API commands that don’t work properly when the window is not visible. The API help notes a few of these, but I’ve lost track of them. Please email me if you’ve found one.
- InsertModelAnnotations3 (found by Gregory Pullen)
- I found out that adding a tangent sketch relation fails when the program is hidden.
5.8. Lock the user interface
Someone pointed out these methods to us after we wrote this post. Our test results are great, so we decided to add it.
There are actually two ways to lock the user interface. The first method is using ModelDoc2.Lock and Unlock. It locks the user interface for one model. Be sure to unlock it after you’re done.
This method made our drawing automation add-in Drew 20% faster at adding sheets and views. Adding notes does not work with the model is locked, so we temporarily unlock the user interface to add a note.
The second method is ModelDoc2.SetBlockingState and ResetBlockingState. You can pick several degrees of blocking. This method did not work very well for Drew, so we have no results to share.
As with all of the methods in this article, you just need to try them out and see which ones work for you.
6. Test results
6.1. Test case 1: a massive number of sketch items
As explained above, I created this macro to create 100 sketches with 100 sketch points each. It’s pretty similar to importing 3D points into SOLIDWORKS, a topic that many asked about on the old SOLIDWORKS forums. I expected massive speed gains by using AddToDB and didn’t know what to expect from the other improvements.
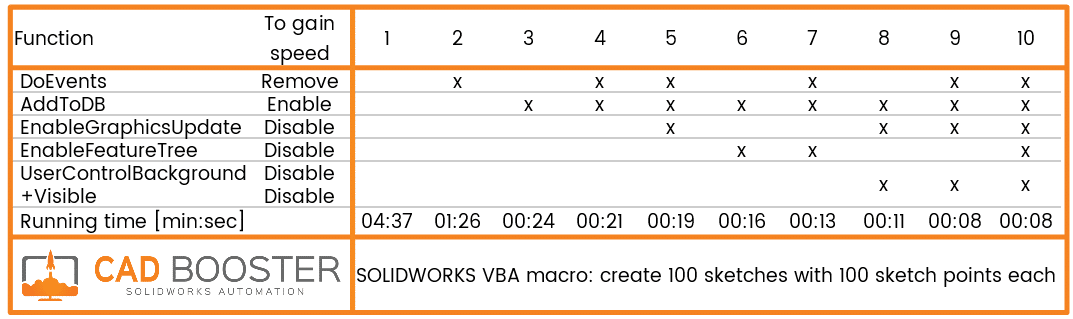
Conclusion: awesome, I got the time from 4 minutes and 37 seconds to 8 seconds!
That means the macro is nearly 35 times faster.
Every function did its work and was able to shave off some time. Only at the very end did I not see a noticeable improvement. You might still be able to see a difference when you start measuring milliseconds.
6.2. Test case 2: Sketching and saving
This time I have added a ‘Save As’ instruction to save a copy of the file after each sketch creation. It still creates 100×100 sketch points.

The results are pretty similar to case 1, the extra time is pretty consistent at 10 to 16 seconds.
Apparently, that is the time required to write a hundred small files to an SSD.
Writing many tiny files to a hard drive would certainly worsen performance.
6.3. Test case 3: Mostly saving
This test case is even more similar to the macro that I want ultimately want to improve the speed of. It creates fewer sketch entities (100 sketches, 10 points per sketch), then saves a copy of the file after each sketch creation. I expect AddToDB to have less of an effect here.

Conclusion: there were fewer sketch entities, so fewer event interruptions. That is why test 1 took considerably less time than in the previous case and that is why there is less of a difference between test 1 and 2. In the end, there still is a difference of a factor 5 in execution speed.
7. Bonus: reading from Excel 100 times faster
I originally didn’t plan to include anything on Excel in this post. That was until I ran a few tests to optimize the macro speed of an Excel-heavy SOLIDWORKS macro. Since Excel keeps roughly 100% of the world’s businesses afloat, I decided to include my results.
I created two XLSX files with 30 columns, one with 100 rows, one with 1000 rows. I wrote a simple macro that reads these cells in three different ways:
- One cell at a time:
- Using the Cells(row, column).Text method
- Putting the result in a string variable
- One row at a time:
- Using the Range(start:end).Value method
- Putting the result in a variant
- All rows at once:
- Using the Range(start:end).Value method
- Putting the result in a variant
- Looping through the variant rows instead of Excel rows
- Getting the last filled row in a certain column (and similarly, the last filled column in a certain row) using:
1 2 3 | With XLworksheet lastRow = .Cells(.Rows.Count, columnLetter).End(xlUp).Row End With |
Excel reading results
The differences were once again incredible. Reading 1000 lines went from 20 seconds to 0.2 seconds, 100 times faster. So if you’re working with a massive Excel file, make sure you read as much of it in one go and use internal variables to process the data. The same goes for writing to and Excel file. Try to do it once, not cell by cell.

8. All results compared
Here’s a quick summary of the seven methods we’ve talked about in this post to improve macro speed:
- DoEvents:
- Advantage: useful when you want to keep the screen updated.
- Disadvantage: killing for performance when you call it too often.
- Call it anywhere in your macro. Only available in VBA.
- No need to turn it off.
- Results: 20% to 70% time reduction by not calling this method.
- AddToDB:
- Advantage: a very powerful setting when you don’t need to process every sketch item for relations and snapping.
- Disadvantage: those automatic relations can be pretty useful and sometimes you just need them.
- Call it from your ModelDoc2 object.
- Disable it after you’re done.
- Results: 40% to 70% time reduction by setting this property to true.
- DisplayWhenAdded:
- Advantage: halts drawing new sketch objects until you redraw or rebuild.
- Disadvantage: you have to turn it off again or the user will have to rebuild for every sketch object.
- Call it from the ModelDoc2.SketchManager object.
- Enable it after you’re done.
- Results: yet unknown by setting this property to false.
- EnableFeatureTree:
- Advantage: stop unnecessary updating of the feature tree and win back time.
- Disadvantage: none found so far.
- Call it from the ModelDoc2.FeatureManager object.
- Enable it after you’re done.
- Results: 25% to 35% time reduction by setting this property to false.
- EnableConfigurationTree:
- Advantage: stop unnecessary updating of the configuration tree and win back time.
- Disadvantage: none found so far.
- Call it from the ModelDoc2.ConfigurationManager object.
- Enable it after you’re done.
- Results: yet unknown.
- EnableGraphicsUpdate:
- Advantage: stop updating the main graphics window.
- Disadvantage: Windows thumbnails might not work when saving files.
- Call it from the ModelDoc2.FeatureManager object.
- Enable it after you’re done.
- Results: 30% time reduction by setting this property to false.
- UserControlBackground + Visible
- Advantage: hide everything for the biggest speed gains.
- Disadvantage: your whole SOLIDWORKS window disappears. Don’t forget to enable it again.
- Call it from the SolidWorks object.
- Remains active for the entire session until turned on again.
- Results: 15% time reduction by hiding the window.
- Lock / unlock model
- Advantage: Locks the user interface while you’re doing intensive API calls.
- Disadvantage: Some calls do not work. In our case adding notes stopped working.
- Call it from your ModelDoc2 object.
- Remains active until you call the Unlock method.
- Results: 20% time reduction by locking your model.
9. Afterthoughts
These have been a pretty fruitful couple of days. I created macros that could bring my computer to its knees for minutes. Then I found ways to make the same macro run in seconds.
SOLIDWORKS offers many methods to improve execution speed. I was surprised to see that we could improve the macro speed by a factor of two or three with each method.
When you combine them all, the result is at least an order of magnitude faster, maybe even two. I can’t wait to add all of these improvements to my macro which takes 24 hours to run.
Did these tips help you improve your macro speed as well? Do you have a method to add to this list? Please let me know.